SignIn/SignUp with Facebook in React and Node.

Hello Everyone, Today we are creating the Simple React app in which we integrate the Facebook login and set up the node to handle the Facebook login request.
We are following the folder structure which we had made in the previous blog so if you are not familiar with that you can go and check my previous blog
First of all, create a simple react app with the following command
npm create-react-app myappStart the react project by running this command
npm start
The above screen appears, Remove the unwanted code and create the simple button and do some CSS.
<p>Login With Facebook</p>
<button className='facebook-btn'>Facebook</button>.facebook-btn{
background-color: #3B5998 ;
border: none;
height: 25px;
color: white;
border-radius: 5px;
}After doing it looks like this

Now, Create the Click listener and request to the backend URL as our server is listing on port 4000 and the backend route of facebook logn is “auth/facebook”. So we then we’ll continue the login-with-facebook process on the server side
  const facebookLoginHandler = () => {
    window.location = "http://localhost:4000/auth/facebook";
}<button className='facebbok' onClick={() => facebookLoginHandler()}>
Facebook
</button>Your App.js look like this
import './App.css';
function App() {
const facebookLoginHandler = () => {
window.location = "http://localhost:4000/auth/facebook";
}
return (
<div className="App">
<header className="App-header">
<p>Login With Facebook</p>
<button className='facebbok' onClick={() => facebookLoginHandler()}>
  Facebook
</button>
</header>
</div>
);
}
export default App;Server Side
I’m hoping that you have the necessary packages installed. So, install the following packages for Facebook login.
npm i passport-facebook
npm i dotenv
npm i cors
npm i cookie-parser
npm i express-session
Then, in your index.js paste the following code. On redirection to frontend, you have to pass the access token to frontend so we can use it for further processing.
we have to include the “cors” configuration to allow the request from all the origins. Also, we included the section timeout to handle if the request take too much time.
const cors = require("cors")
const passport = require("passport");
var cookieParser = require('cookie-parser')
var session = require('express-session')

//__ Third Party Middleware __ //
app.use(session({
 resave: false,
 saveUninitialized: true,
 secret: 'bla bla bla'
}));

app.use(passport.initialize());
app.use(passport.session());


//__ Social Login Helper __ //
require("./src/socialLoginHelper/facebookLogin")(passport)


//__ Facebook Stragerty __ //
app.get("/auth/facebook", passport.authenticate("facebook", { scope: ["email"] }));

app.get("/auth/facebook/callback", passport.authenticate("facebook", {
  failureRedirect: "/auth/social/failure",
  failureMessage: true,
 }),
 (req, res) => {
  let baseUrl = "http://localhost:3000";
  res.redirect(`${baseUrl}?t=${req.user.socialAccessToken}&facebookk=n`);
 }
);


//__ Allow All request __ //
var corsOptions = {
 origin: "*",
 optionsSuccessStatus: 200,
};
app.use(cors(corsOptions));
Create the folder named “socialLoginHelper” and create the file “facebookLogin.js”

In the facebookLogin.js file paste the following code
const FacebookStrategy = require('passport-facebook').Strategy;
require("dotenv").config()

//__ Import the user model TO STORE THE DATA into DB __ //
const User = require('../api/models/user.model')


// __  Get the data from ENV __ //
const facebookAppID = process.env.FACEBOOK_APP_ID
const facebookAppSecret = process.env.FACEBOOK_APP_SECRET
const facebookAppCallback = process.env.FACEBOOK_APP_CALLBACK


module.exports = (passport) => {
    passport.serializeUser(function (user, cb) {
        cb(null, user);
    });

    passport.deserializeUser(function (obj, cb) {
        cb(null, obj);
    });

    passport.use(new FacebookStrategy({
        clientID: facebookAppID,
        clientSecret: facebookAppSecret,
        callbackURL: facebookAppCallback,
        profileFields: ['id', 'displayName', 'photos', 'email']
    },
        (accessToken, refreshToken, profile, done) => {
            console.log('refresh' , refreshToken);

            createOrUpdateProfile(profile._json.id, profile._json.name, profile._json.email, profile._json.picture.url, accessToken , refreshToken)
            .then(user => {
                return done(null, user)
            })
            .catch(err => {
                return done(null, false, { message: 'User alreardy exist' })
            })
        })
    );
}

//__ Save the Data into DB __ //
async function createOrUpdateProfile(id, firstName, email, imageUrl,  accessToken, refreshToken) {
return User.findOne({ profileId: id }).exec().then(async (user) => {
    if (!user) {
        user = await new User({
            email,
            profileId: id,
            fileName: imageUrl,
            isEmailVerified: true,
            password: email + firstName,
            firstName: firstName || 'NA',
        }).save();
    }
        user.socialAccessToken = accessToken;
        user.socialRefreshToken = refreshToken;

    return await user.save();
    }).catch(err => {

    })
}
We are storing the basic details of the user you can change the details according to your requirements
To get these keys we have to create the “APP” on Facebook developer tools.
clientID:      facebookAppID,
clientSecret:  facebookAppSecret,
callbackURL:   facebookAppCallback,
Creating the Facebook App click here to create the Facebook app and follow these steps
- My App → Create App

2. Select “None”

3. Name your App.
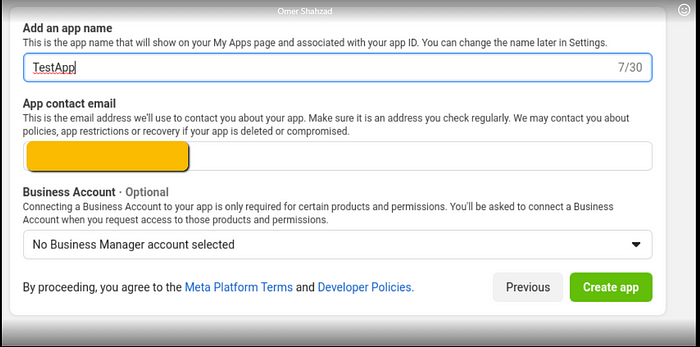
Click on “create app”
4. Click on Setting → Basic

On the Basic Page, you can get your “facebookAppSecret” and “facebookAppID”,

Add these key’s to your .env file and access your “FacebookLogin.js
The last thing we have to add in our env is the facebook-Callback-URL which we have used in your index.js file
FACEBOOK_APP_CALLBACK = http://localhost:4000/auth/facebook/callbackRun the Your server and frontend application to test.
on Clicking the Butoon which we have created in our frontend it willl show the following screen

Note:
The above procedure will work for local setup but if your code is onn live server you can do one more step
From the sidebar FacebookLogin → Setting. In “valid OAuth redirect URL” place the URL of your live site,. As I’m using local so it is not required .

Conclusion:
In this Blog, we’ll implement the Facebook login on the server side and store the data in our DB. After storing the data redirect the user to the frontend URL with the access token to use for further process